
Guess what IIIIIII maaaaaaaaaaaaade......

OK, that wasn't a hint, as much as it was the full, visible answer. BUT- if you said- ANOTHER QUILT! Then BINGO, you're right!
A little while back I was feeling like I was a in a bit of a rut, creatively. Somehow I found out about Stash Builder Box- a subscription service for fabric, and I thought maybe getting fabric delivered every month would provide me with inspiration (and motivation) to start making things again. I had no real need for more fabric, and no real clue what I would want to make, but the collections they put together are so cute, I knew I'd figure something out without too much trouble. Plus, 20% of their proceeds go to making quilts for kids in need- I love the idea that my hobby could benefit others too! (I even signed up to be a Heart Builder, so soon I'll be making a quilt top for them!)
But...back to today's project...
My first box arrived in March, with three yards of Cotton + Steel Sleep Tight collection fabric. and I was giddy (side note: Does Cotton + Steel make anything I don't love? No, no they do not.) The prints were so cute...and bonus: it was my fav color palette, black/white/grey. I knew immediately I wanted to make a baby quilt (how could I not, with all those cute little woodland creatures/smiley faces/ice cream?) Only slight problem...I don't have a baby who needs a quilt. But that seems like a minor detail. After all, if you quilt it, they will come, right? (Dustin is starting to get nervous when the sewing machine comes out. It's bad enough that I hoard quilts, but we're getting really close to collecting humans to go with them.)
So with no plan and no purpose, I set out to make something adorable just for the fun of it. It was new for me to not really have an end use in mind, but it felt right to break my quilting dry spell (I haven't made one since Miller's over a year and a half ago) with something just "for the love of the game".
I had pinned a quilt idea a while ago, that I thought would be fun to try (where else, but the Cotton + Steel Blog?!) so I adapted that a bit to fit the fabrics I had on hand, and the size I was aiming for. (I was thinking somewhere in the 36"x48" range, so that it wouldn't take forever, or require a lot of extra yardage).
Here's the big TA-DA and then I'll backtrack on the winding road it took to get there.

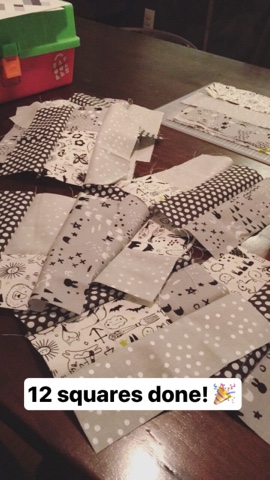
I laid it out in Illustrator first, to make sure I liked it...I was originally planning on doing the 3-piece squares with white background, just like the inspiration quilt. But to mix it up a bit, I decided to add a little square to each group, so that there are 4 fabrics in each one of the squares ( I had 3 prints from my box, and a matching black dot print left over from the girls' quilts.)

There was probably an easy way to do this, sewing long strips together in sets of 3 and just cropping to the length square I needed...but alas, I never make things simple, so I'm sure I ended up cutting and piecing things much more than probably necessary. But, what's done is done. I figure I learn something in the process of each quilt (ok...I actually learn about 90 things, but I'm lucky if I retain a lesson or two) so as inefficient as my process may be, I still get the job done. (Though I'm sure "real" quilters would cringe at some of the things I do- they probably know a standard way to make all these blocks that would save me time/money/fabric. If you are one such person, call me! Help me!)
Once I made all of my diagonal squares, I laid them out again to determine what background fabric I should use. I had a few other black/white prints in my stash, but it was looking pretty busy, so in the end I just picked up a solid grey to coordinate and calm the whole thing down a bit.
Once I made all of my diagonal squares, I laid them out again to determine what background fabric I should use. I had a few other black/white prints in my stash, but it was looking pretty busy, so in the end I just picked up a solid grey to coordinate and calm the whole thing down a bit.
From there I pretty much just kept winging it. The pattern I was loosely basing it all on had all of the finished squares just being sewn together, but I thought it would be fun to add a border between them. Plus it would allow me to feature more of my favorite fabrics. The pieces in the squares were pretty small, so long strips of fabric showed of the prints a bit more. After that, the choices kind of snowballed from there. Once I had borders between the squares, I pretty much had to do a border on the outside too to make it feel balanced. It was definitely more work this way, but in the end, I really like how the layout worked. (It also extended the finished size of the quilt, so it's still great for a baby, but with a little more room for snuggling!)

Once the top was all assembled, I realized there were a few areas where my squares were (way) less than perfectly square, so there are some wonky spots where the borders don't quite line up right. But short of taking some rows apart, trimming them down, and reattaching them (which is even more work than it sounds like) there wasn't much I could do, so I decided not to let it bother me (too much). Again- I learn something each time I quilt, so perhaps the lesson on this guy was "close enough, probably" isn't the same as "actually square". I'll be more precise next time, but the good thing is, the consequences on quilts are pretty low. Yeah, I'll always be able to look at that part of the quilt and know I messed up, but there's also an argument to be made that it's part of the charm of a handmade project. Each quilt ends up being a bit of a time capsule of my skill level at the time, and a physical memento of my growth along the way.

For the back I kept it simple. It seems most people tend to just do one plain fabric on the back of quilts...but I've always preferred to have at least some interest on the reverse side. But this one already had so much going on, that I thought doing a whole lot on the back would be overkill. I had just enough of each of the fabrics left to do big horizontal stripes, so I whipped that up lickity-split.

When it came time to actually quilt it, I was a little hesitant. For some reason I have it in my head that quilting on a regular domestic machine is too hard, but if you believe Pinterest (which, really, you only sometimes should...) it appears people are quilting all kinds of things- even king size quilts!- on their home machines. I had done two other baby sized quilts on my machine though, so I figured I could do this one too...but I wasn't sure about what type of pattern to do. The only thing I really felt comfortable with were straight lines, but that felt like a bit of a cop out, since that's what I've done on all of my quilts (including the longarm version I did, and the ones I had sent to a professional!) Maybe I'm boring, maybe I'm scared of a risk, or maybe I just like what I like (and know what I'm capable of). In any case, I went simple again on this one- just doing diagonal lines in wide, regular intervals.

I thought I would dread the quilting part (I think the design phase is my favorite...or maybe just sewing the pre-cut pieces together) but it was actually kind of fun. I'm starting to look into more complicated techniques, and might even try free motion quilting at some point. Right now I pretty much rely on what I already know about sewing, and just apply it to the world of quilting, but I think I'm probably going to have to start putting some effort into learning more "professional" quilting techniques. There's nothing wrong with being self-taught, but right now I'm more "experimental" than taught, some YouTube tutorials couldn't hurt.
After that all I had left to do was bind it. So that might actually be my favorite part. There's something so satisfying about the last step in the process, knowing that when that's finished, you get to actually enjoy this thing you slaved over forever. Plus machine binding is quick and easy, so it's kind of a no-brainer task that is fun to cruise through. (and I adore the black and white striped binding I have- I bought a huge spool for the girl's quilts, and it's still going strong!)

Then I popped it in the laundry to fluff/crinkle up, and voila...another Bowden quilt is complete.

Once the top was all assembled, I realized there were a few areas where my squares were (way) less than perfectly square, so there are some wonky spots where the borders don't quite line up right. But short of taking some rows apart, trimming them down, and reattaching them (which is even more work than it sounds like) there wasn't much I could do, so I decided not to let it bother me (too much). Again- I learn something each time I quilt, so perhaps the lesson on this guy was "close enough, probably" isn't the same as "actually square". I'll be more precise next time, but the good thing is, the consequences on quilts are pretty low. Yeah, I'll always be able to look at that part of the quilt and know I messed up, but there's also an argument to be made that it's part of the charm of a handmade project. Each quilt ends up being a bit of a time capsule of my skill level at the time, and a physical memento of my growth along the way.
For the back I kept it simple. It seems most people tend to just do one plain fabric on the back of quilts...but I've always preferred to have at least some interest on the reverse side. But this one already had so much going on, that I thought doing a whole lot on the back would be overkill. I had just enough of each of the fabrics left to do big horizontal stripes, so I whipped that up lickity-split.
When it came time to actually quilt it, I was a little hesitant. For some reason I have it in my head that quilting on a regular domestic machine is too hard, but if you believe Pinterest (which, really, you only sometimes should...) it appears people are quilting all kinds of things- even king size quilts!- on their home machines. I had done two other baby sized quilts on my machine though, so I figured I could do this one too...but I wasn't sure about what type of pattern to do. The only thing I really felt comfortable with were straight lines, but that felt like a bit of a cop out, since that's what I've done on all of my quilts (including the longarm version I did, and the ones I had sent to a professional!) Maybe I'm boring, maybe I'm scared of a risk, or maybe I just like what I like (and know what I'm capable of). In any case, I went simple again on this one- just doing diagonal lines in wide, regular intervals.
I thought I would dread the quilting part (I think the design phase is my favorite...or maybe just sewing the pre-cut pieces together) but it was actually kind of fun. I'm starting to look into more complicated techniques, and might even try free motion quilting at some point. Right now I pretty much rely on what I already know about sewing, and just apply it to the world of quilting, but I think I'm probably going to have to start putting some effort into learning more "professional" quilting techniques. There's nothing wrong with being self-taught, but right now I'm more "experimental" than taught, some YouTube tutorials couldn't hurt.
After that all I had left to do was bind it. So that might actually be my favorite part. There's something so satisfying about the last step in the process, knowing that when that's finished, you get to actually enjoy this thing you slaved over forever. Plus machine binding is quick and easy, so it's kind of a no-brainer task that is fun to cruise through. (and I adore the black and white striped binding I have- I bought a huge spool for the girl's quilts, and it's still going strong!)
Then I popped it in the laundry to fluff/crinkle up, and voila...another Bowden quilt is complete.
I still don't really have a plan for it, but that doesn't mean I don't love it. I assume we'll use it for any foster placements we may have. Or I may end up being able to part with it as a gift (Doubt it. I get pretty attached to these things...) But in the meantime, just the experience of making it was worth it for me.
Sweet Dreams, indeed.


-------------------------------------
Psssst....Want to get all the Bowdenisms news delivered right to your inbox?
YES PLEASE! Subscribe via email and never miss an -ism. xox.
YES PLEASE! Subscribe via email and never miss an -ism. xox.


No comments :
Post a Comment