Showing posts with label quilting. Show all posts

Wednesday, December 8, 2021

Merry Quilt-mas

What's the best part of Christmas?
Christmas trees? 
Christmas trees? 
And more Christmas trees? 

Well...YES.
But also: Snuggling up near those Christmas trees, and watching Christmas movies. 
 
And to do THAT properly-you need a Christmas quilt! 
 
Well, good news for our family...we have one! But when it comes to all things Christmas (or all things Courtney) is one enough? OF COURSE NOT. 

So it comes as no surprise that as I started to pull out our Christmas decor, I started to feel the urgent need to MAKE. So I went ALL in and started my own unofficial 12 Days of Christmas Quilting event.

And here's the end product of my End Game:


I fa-la-la-la-love it!! The behind the seams details:
  • Quilt Pattern: End Game by Tied with a Ribbon. This isn't a Christmas pattern specifically, but aren't the triangles just the most perfect trees? It was a pretty simple pattern...though it took me a little while to land on my fabric layout. Once I started actually sewing the top it came together super quickly. And I've never worked with equilateral triangles before, but just working in rows across made it pretty simple. (This triangle ruler made cutting pieces SO much faster).


  • Fabric: It's a big mix of things from JoAnn's. (You know I'm all about convenience...and a deal). 50% off Christmas fabric? Yes, I will take them all. The backer fabric has little green trees, and is actually a part of their year-round line: White Sketched Forest Quilter's Showcase Cotton. The white background is also a non-holiday fabric- it has teeny-tiny white-on-white triangles that don't show up in pictures really but add just a hint of pattern/texture when you see it up close: Triangles White On White Quilter's Showcase Cotton. The rest were mostly JoAnn's exclusives, with the exception of one "designer" fabric: Merry Main Street Alexander Henry Christmas Cotton. I knew the minute I saw that I wanted it to have a special spot in the quilt. I love the retro vibes, and the colors are perfect. It's can be fine line between cute and "cutesy" when making Christmas-themed things, so I tried to use just a small hit of this fabric to keep the whole thing modern, and not overly-literal. I love that addition though..it feels a little quirky without being over-the-top.


  • Backing design: I don't know why I insist on doing special designs on the back of all of my quilts. It's double the work...maybe triple, because you have to do two unique sides, PLUS make sure they work together (and it complicates the quilting pattern). But DANG it makes the whole thing more special. So I continue to torture myself, and no matter the mental gymnastics or physical labor, I am always grateful I did it. This one was no exception. I agonized over what to put on the back (ok, agonized might be a touch over dramatic, but I did toy with more than a handful of options for an hour at least, just hemming and hawing and consulting with my studio-mate/husband). I didn't want to recreate the front too closely, but I still wanted them to feel related. I was also working around some fabric limitations/seams on my backer, and I wanted to make sure that whatever I designed would line up with the front when I sandwiched them so I could plan my quilting to work with both. I finally landed on two simple triangles made up of a mix of fabrics, to pull in all the prints and patterns and mimic the shapes from the front. And...I love it. For me- the backer result is always worth the backer effort. 

  • Quilting design: My skills are limited here, so straight lines it is! It's really just a matter of how many, and which way they go. I got inspired by some fancy stuff I saw others doing, but 1: a lot of other End Game quilts use solids, so more elaborate quilting would stand out a bit more. 2: my best skill isn't quilting, so it didn't seem to make sense to pour a ton of effort into something that still may not turn out awesome. At this stage, for this quilt, simple seemed best- so I went with diagonal lines, parallel to one side of my triangle seams. They're about 2.5" apart, evenly spaced with 3 lines across on each triangle. 


  • Timeline: I wasn't kidding when I said it was the 12 Days of Christmas Quilting. I bought all my fabric on Friday November 12th, and wrapped it up late Tuesday the 23rd (just in time for Thanksgiving). That was a lot


  • Media of choice while I worked: Netflix Christmas movies, obviously! I watched Love Hard, Single All the Way, Father Christmas is Back, A California Christmas, and The Holiday Calendar. I sprinkled some Disney+ in there too (The Sandlot, Saving Mr. Banks) and when that all got too saccharine-y, I made a HARD pivot, and binged season 2 and 3 of You. A stalker/serial killer series is probably not the most appropriate background track for a Christmas quilt, but I've learned that I sometimes prefer having a series to watch while I work, rather than movies, because it gives you more uninterrupted hours of content. With movies I had to figure out something new to watch every 1.75 hours, but with a series (especially one with multiple seasons) you can just leave it on indefinitely.
  • New thing I tried/learned: Well, I've apparently made my own binding before, but that was on my very first quilt, back in 2013, so my memory of that is pretty much nil. Typically I use pre-made bias tape, but I knew I wanted candy cane stripes for this one (and didn't want to spend time or money on an Etsy order) so I thought I'd try making it myself. I found some easy tutorials and while it definitely took more time than store-bought tape, I really am proud of the result. For this design it needed to be on the bias (to get the stripes to be diagonal) but in the future I think I'll try just cutting regular strips of fabric in order to have custom colors or patterns.


  • Final thoughts: This was SO fun to work on. I've been quilting a LOT over the last month or two (I still have another finished project to share...) which has gotten a little overwhelming at times (it's a lot of late night hours). But mostly it's been a happy place for me. I love doing something with my hands, getting into the "flow", and the feeling of accomplishment that quilting provides. And after making a lot of quilts for other people, it's fun to have one that I get to enjoy! This holiday time is so special...and so is having a keepsake like this.
And just for fun- here are some shots of my two Christmas quilts together. I love how they work together without being too matchy. They're both already getting lots of snuggle time, so I can attest they look just as good mashed up in a big ball on the couch.


Ooooh- P.S. While I was in the Christmas crafting mood, I whipped up a couple gifts for a friend's new twin babies. I made some truly tacky terrible stockings for Dustin and me our first year of marriage (I think I finally donated them to Goodwill last year after leaving them stuffed in the bottom of a bin for years) but other than that I've never tried stockings. When Katie said she really wanted some faternal twin stockings for her fraternal twin babies, I figured I'd give it a shot! I mish-mashed two free patterns together- mostly this patchwork one, using the shape and finishing methods from Suzy Quilts. It ended up being a touch harder than I thought...but maybe just because I tried to get them done in a matter of days (and I picked a pretty labor intensive design), but all things considered, I'm so pleased with how they turned out. Love the idea that my work gets to be part of people's lives and traditions. (All of the fabric is collected from my two quilts, and the inside lining is the white fabric with little trees. So cute!)


All Sources/Details:

Pattern: End Game by Tied with a Ribbon
Finished size: 62" x 72" (designed to be a throw)
Total Time spent: About 29 hours. But that includes lots of "think time"- incluidng choosing fabric,
Cost: Honestly...I don't really know. I am not greaaaaat at keeping track of such things (maybe I don't want to know?!) but I also had some issues with my e-receipts getting lost so we'll just say it was a gift from Santa.

Fabric: All JoAnn's. With enough leftovers to make some other things...like this tree skirt. NEXT year.
Binding: Made from red and white stripe fabric, using this tutorial. (I am not kidding when I say the tip on how to press it into double fold tape BLEW MY MIND). Mr. Domestic also has a reel that shows the process well. And I always follow Cluck Cluck Sew machine binding tutorial.
Batting: Pellon Nature's Touch Cotton Batting Twin Size 72"x90". (It was cheaper to get pre-packaged, vs. by-the-yard even though it was a bit larger than I needed it. The extra was more than enough to make stockings with, and I still have some big-ish scraps I can use for something.)
Tools: For those of you looking to get some of the basic tools of the trade- here's what I can't quilt without.

  • Triangle ruler - this was fairly specific to this project, but even if I never use it again (which I honestly am already planning to) it still would have been worth it to sail through the cutting process.
  • Scissors - Is it weird to have a favorite style of scissors? Well...then I'm weird. These are the
  • Cutting Mat & Rotary Cutter- Must haves.
 
 
P.S. See more quilty goodness: here on the blog, or on IG via #bowdenismsews
--------------------------------------------
Psssst....Want to get all the Bowdenisms news delivered right to your inbox? 
YES PLEASE! Subscribe via email and never miss an -ism.  xox.

Thursday, August 26, 2021

Desert Vibes

A special person + a special occasion calls for one thing: a special quilt! 

My niece is moving to Arizona for college (she actually started her road trip there yesterday morning, so should be arriving in Phoenix in a few hours...depending on how many times her Dad and her cat wanted to stop for snacks!), and she asked me to make a quilt for her dorm room. And like most things in her life- Ali knew what she wanted! (I like that in a girl!) This is the first quilt I've done "by request"...she had seen the "Night Sky" quilts I made for my friend's babies, and asked if I could make a grown up version of those. That of course meant scaling it up for a "big girl bed" but she also wanted it have "out west" vibes, with neutrals, and her favorite color: coral. Kind of like a desert sunset. I caught her vision, and was up for the challenge. At the time, her departure was about a month away, so I figured I'd have plenty of time to knock it out...after all, I had just made two just like it...how hard could it be?

(and that, dear readers, is what they call foreshadowing...)

But we've got enough sadness with our beloved Ali leaving...let's focus on the happy parts of this project. Like- the finished product!

 Oooooh.

Ahhhh. 

(in blog land you have to be your own hype girl)

Now do a little twirl: 

No, not like that, I mean let's see the back!


What do you think? Desert chic, no? 
 
This quilt was a challenge (aren't they all?!) but I'm really proud of how it turned out. With each new project I learn new lessons (the hard way. always the hard way). So this is another "made with love not perfection" piece. Hopefully all of my "mistakes" can be considered part of the charm. (I try to tell myself- in quilting, and in life- that no one notices my flaws as much as I do...) It was a labor of love for sure, and I really hope having a piece of home/family with her keeps her body- and heart- warm. (But let's be real, she'll be in Phoenix, which is about 1 degree away from the surface of the sun, so warmth won't really be an issue. Maybe she'll just tack it up to her wall to remember us by).

So that's the short story with the big payoff...for those of you detail nerds...here's the full tale:
  • Quilt Pattern: I based this off of the NightSky Quilt by SkyClad Quilts, but that pattern doesn't go up to a twin size, so I had to modify/improvise. Mostly that just meant buying WAY more fabric (which is still somehow never enough) and playing around with the layout to get the "mountains" to look right. This pattern is a little hard to without wasting a lot of fabric (last time I was able to use the leftover yardage from one set of mountains to make another similar set of mountains for the second quilt. No such option for this big singleton.) and I haaaaaate wasting fabric (call me cheap- but I prefer efficient) so I had to finagle things a bit to get it all to work. That's the problem solving component of quilting, which- when it isn't making my brain hurt- is actually part of the fun.

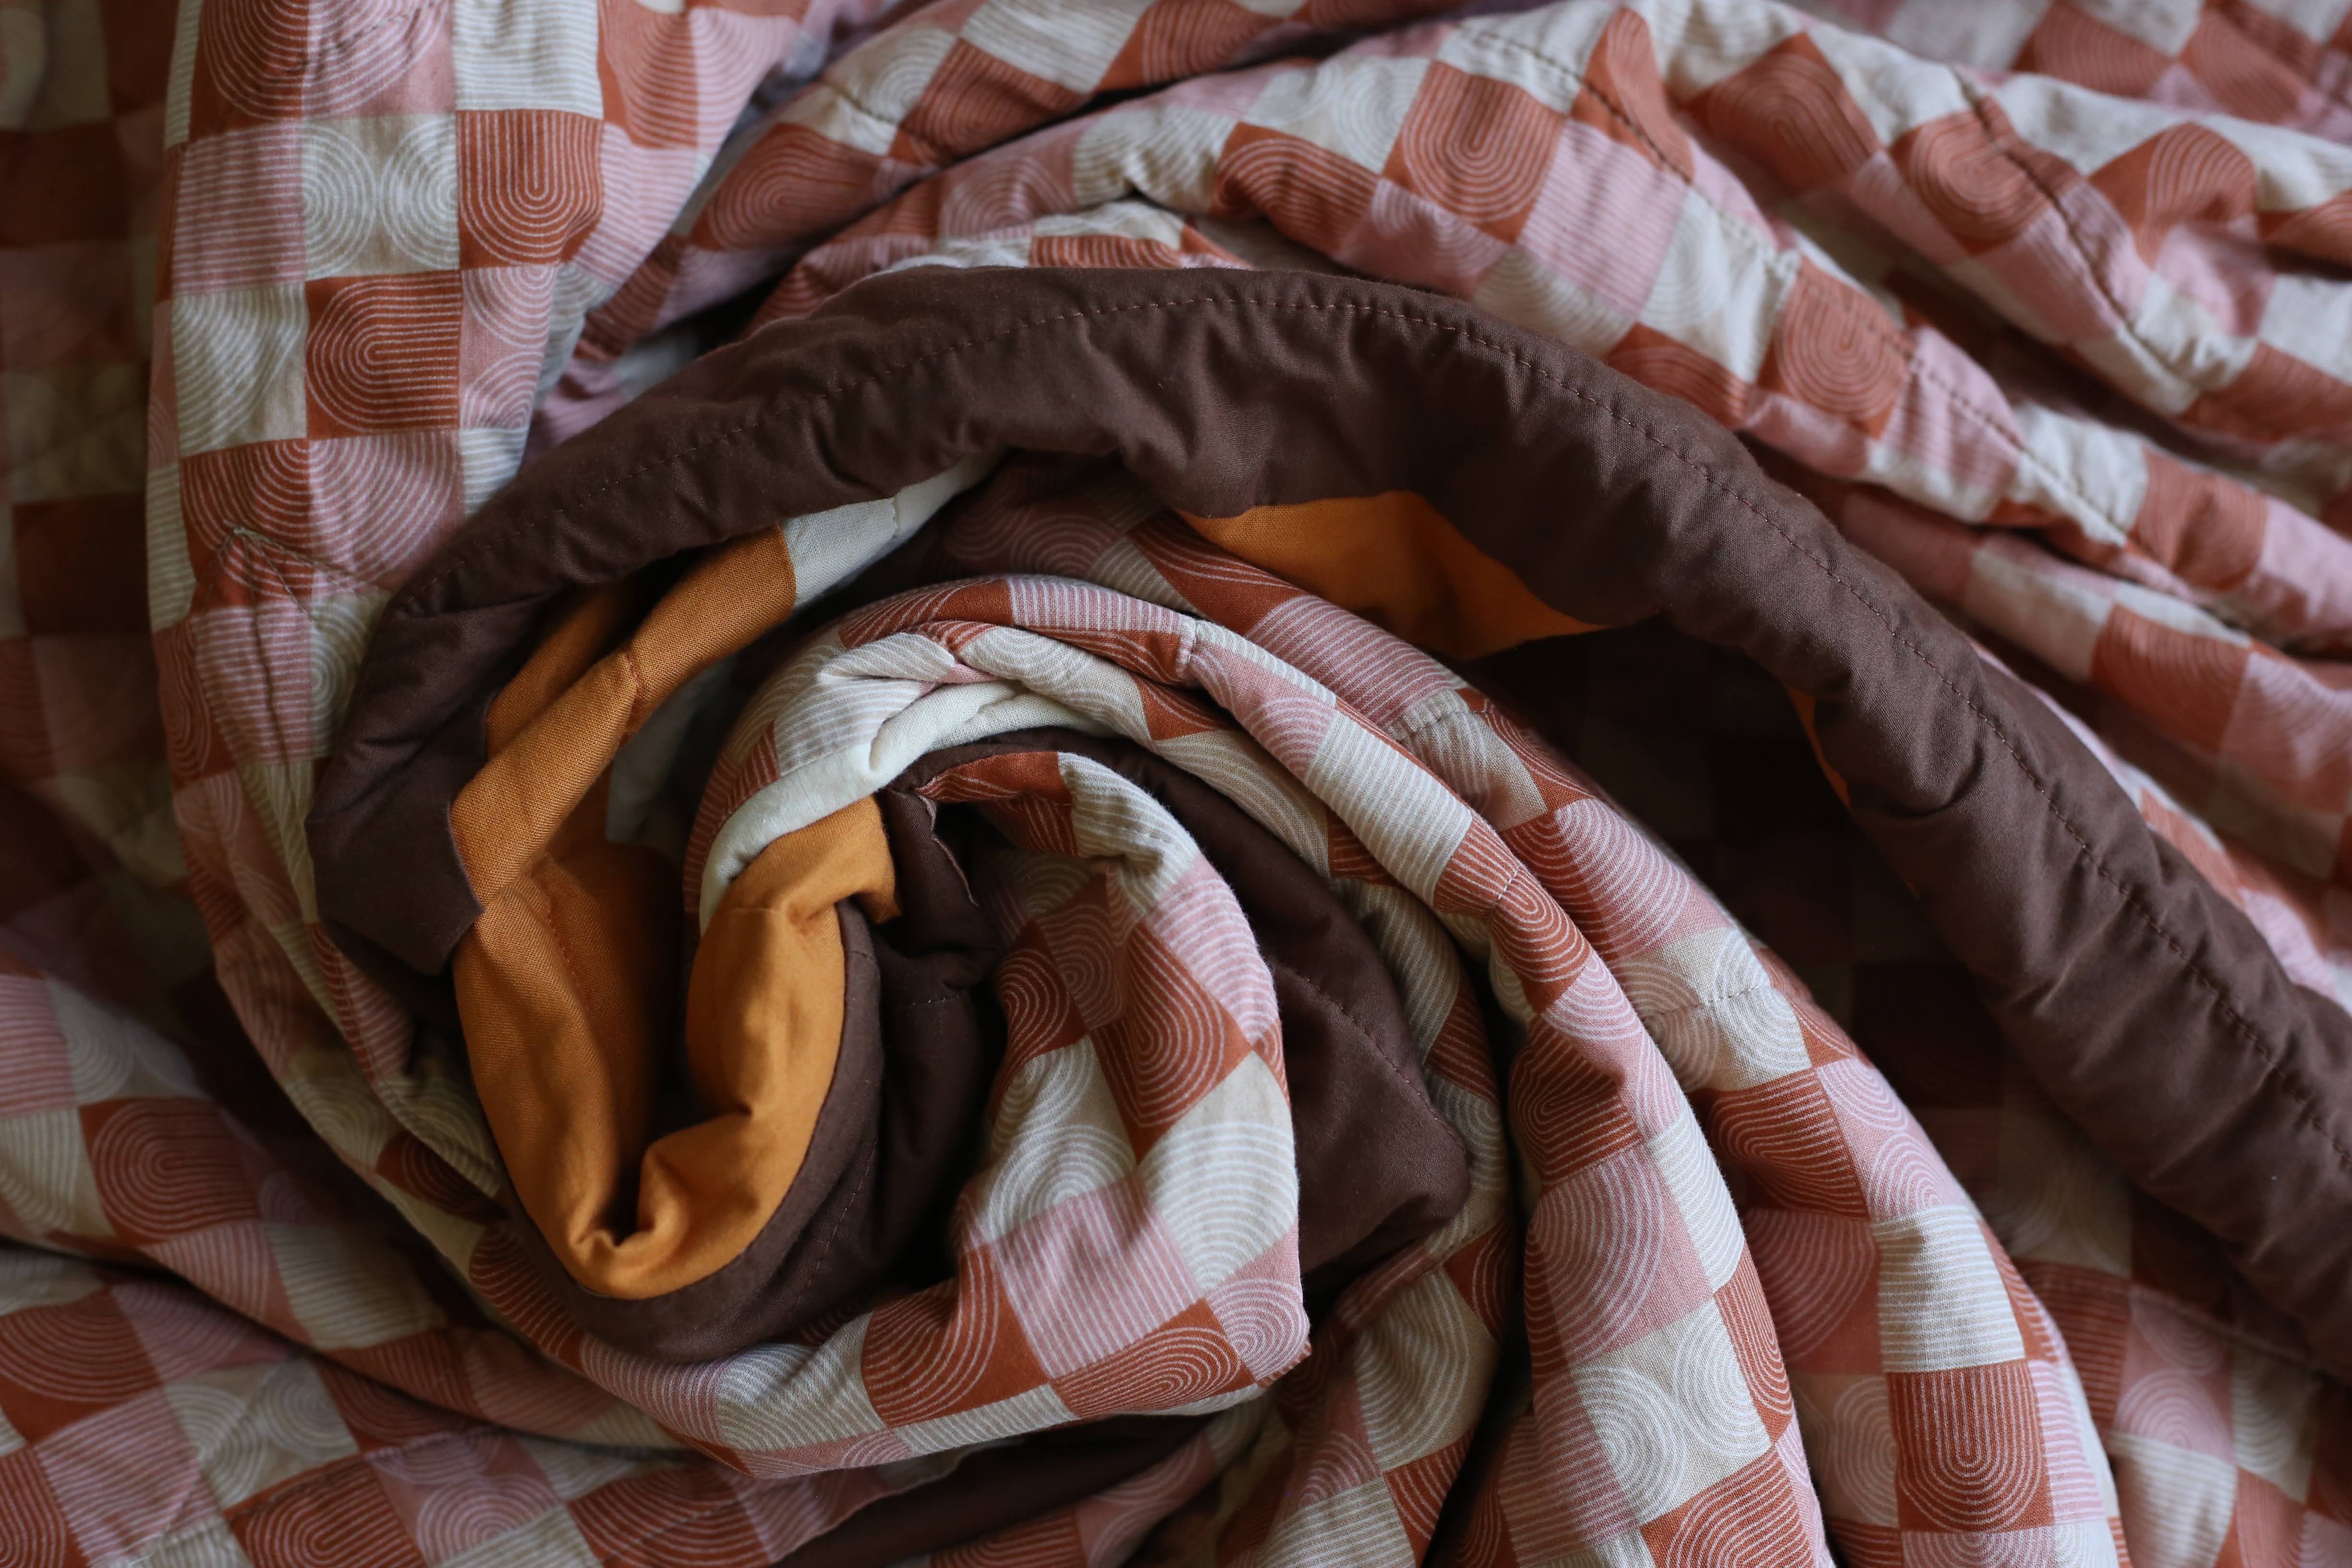
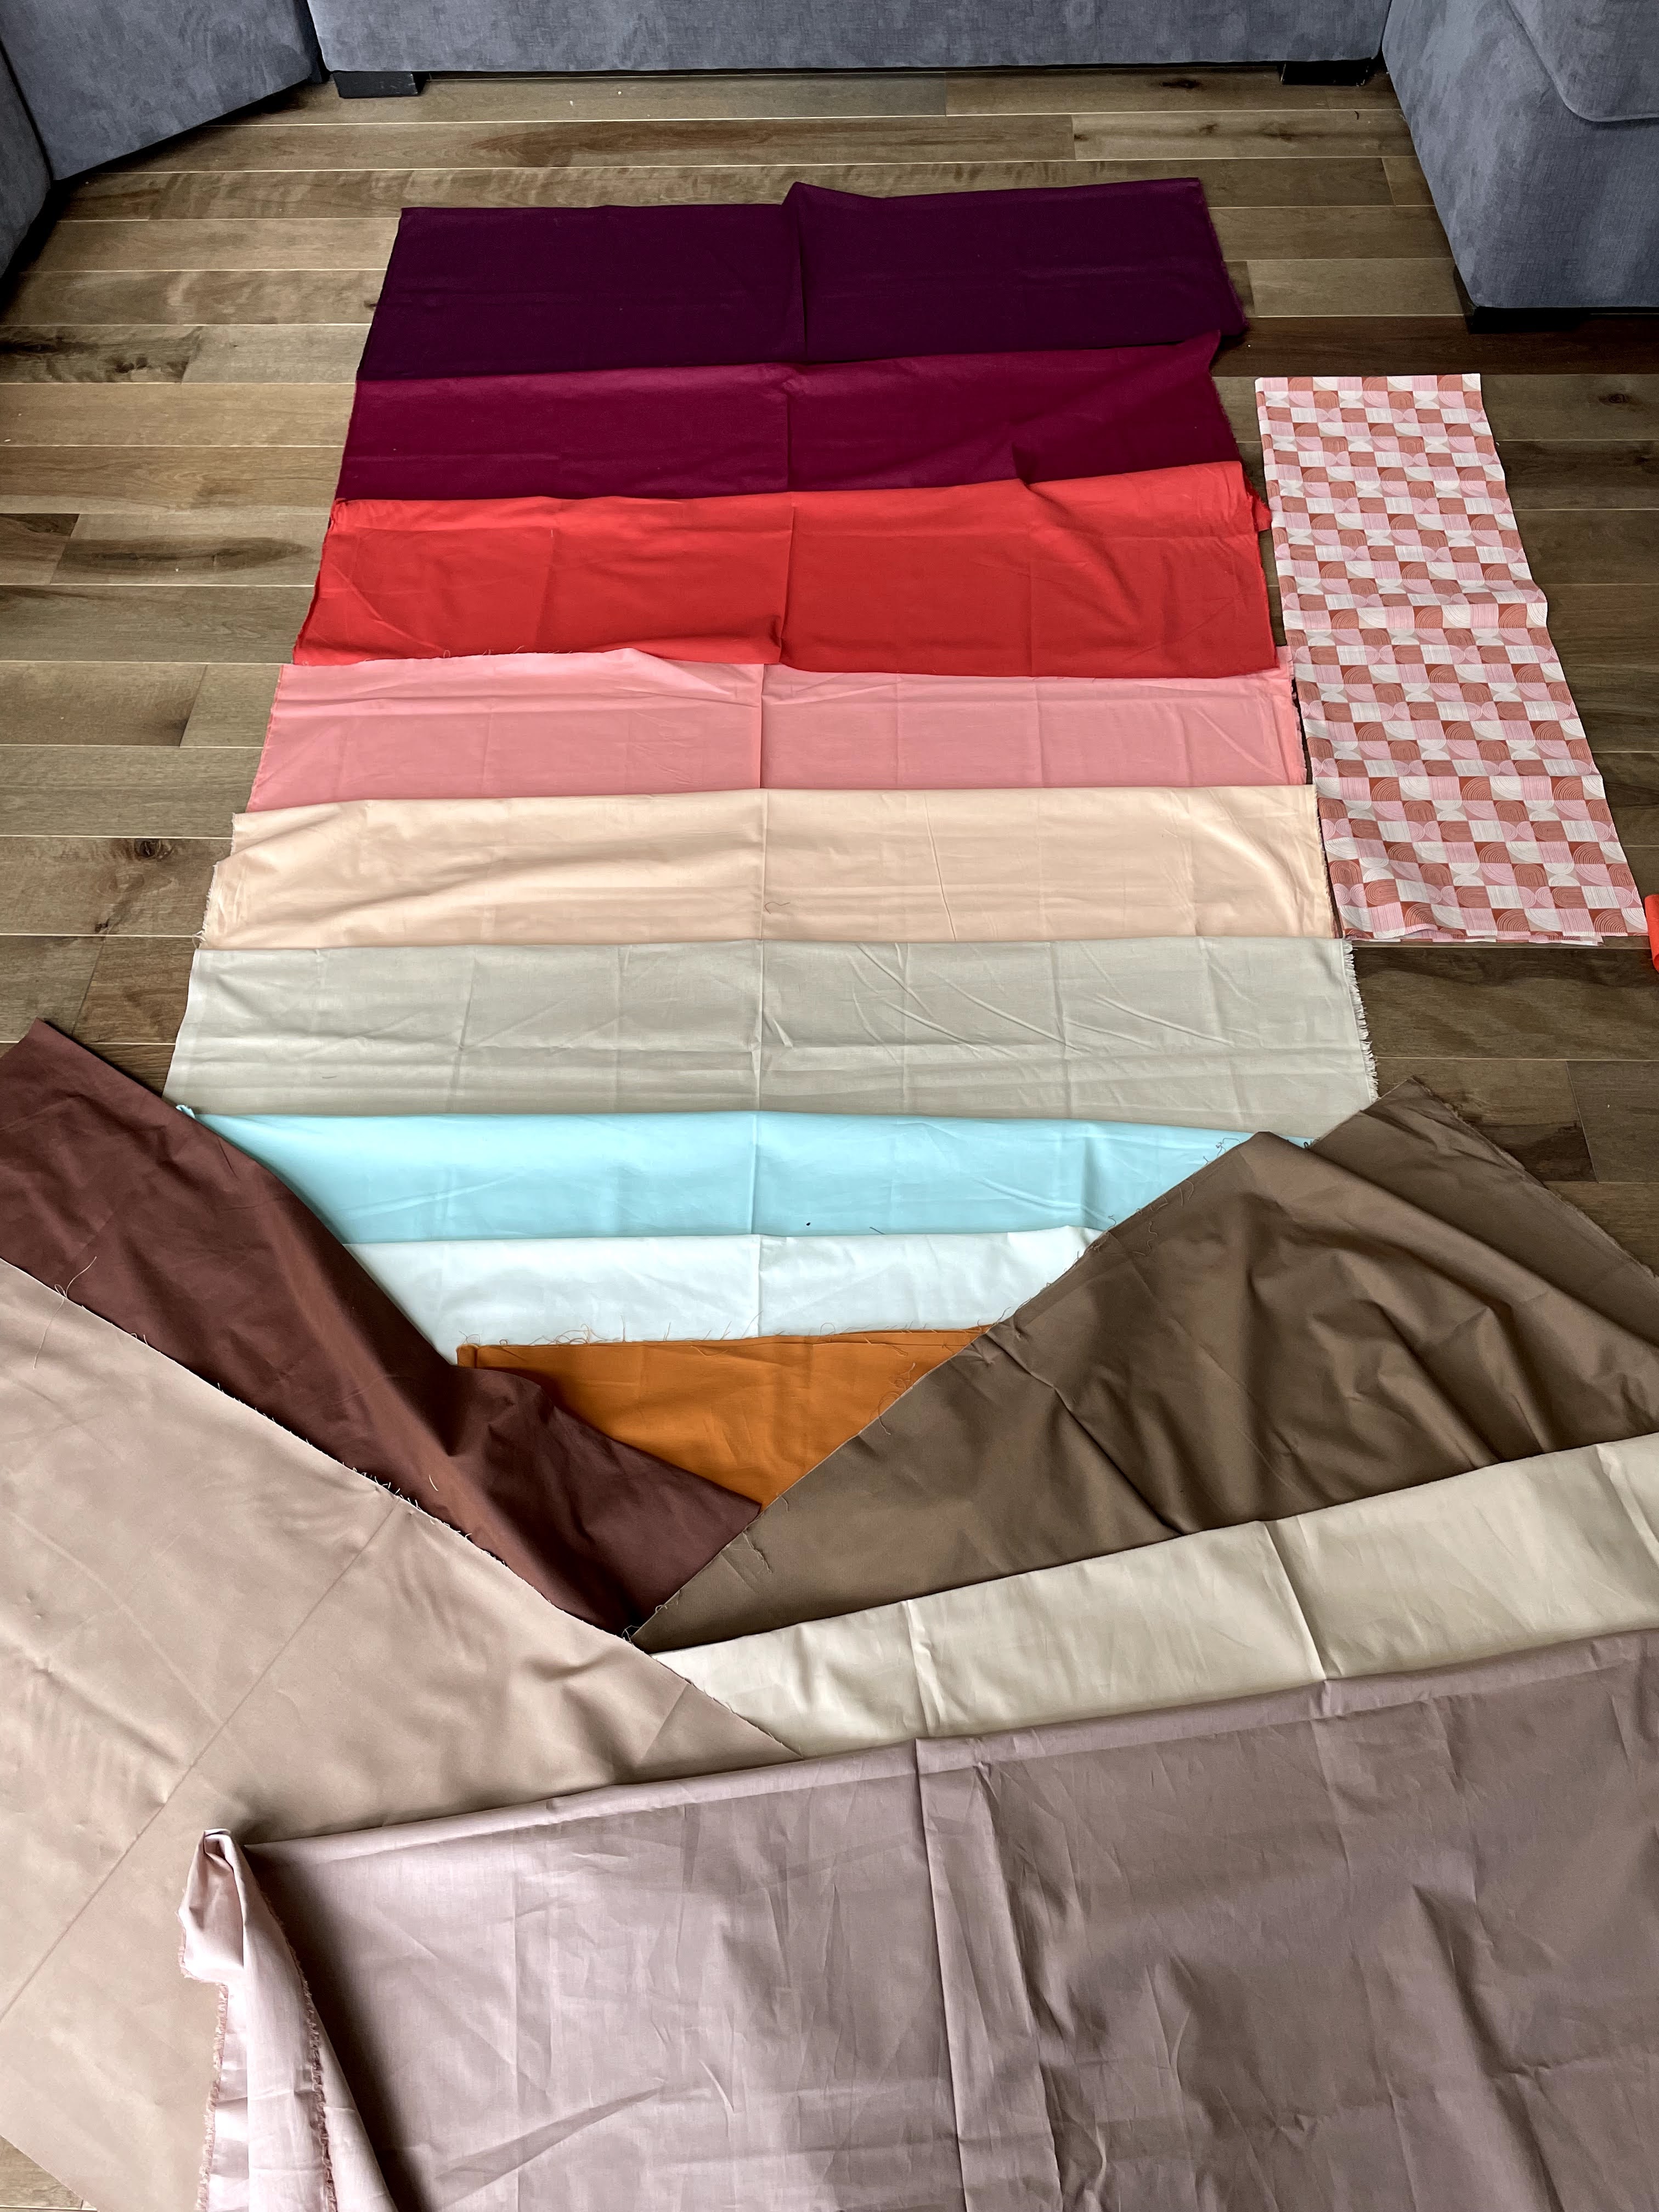
  • Fabric: Like the baby quilts, this was all solids- a mix of JoAnn's basics and Kona Cotton. I really struggled to get the colors to work with each other...I must have tried every combo under the (desert) sun. To some degree, I was limited by what was available in stock. I got the bulk of my fabrics at JoAnn (I'm a sucker for a coupon), but eventually I hit up a specialty shop, Quilt Beginnings, for some harder to find shades. I played around with a ton of layouts, and eventually settled on a gradient I thought worked. (Maybe I finally called it done when I felt satisfied with the selections. Maybe I stopped when Piper and Little Miss ran out of patience comparing nearly identical shades of beige. Hard to say.) I wasn't quite sure what I was going to do for the back, and got a little nervous that nothing would be quite right (sophisticated prints can be a little hard to come by in a sea of classic country, seasonal and whimsical options) but when I found this Oasis Modern Geo I knew I had a winner. My kids were skeptical (I think they just don't really "get" brown) but I follow enough younger-than-me, cooler-than-me influencers to know the color combo and arched lines were going to be perfect. 


  • Backing design: I had every intention of making this easy on myself, and just using the single fabric for the backer. But alas, my calculations fell a weeeee bit short, and I didn't quite have enough fabric to make the finished quilt the length I needed. So I improvised (an ongoing theme in my quilting adventures) and decided to add a little set of stripes to the back. This both made the quilt better (visual interest!) and harder (lining things up!) so I'm not sorry exactly...but it certainly was a choice with consequences. If I had it to do over again, I think I maybe would have still done something special on the back, even if it wasn't to bridge a math-gap (I just love flipping a quilt over to find a little surprise!) But I maybe would have thought through how the front and back were going to work together so the actual quilting part wouldn't have been so tricky. 

  • Quilting design: Ok...I can never quite decide what my favorite part of quilting is (it's a tie between planning a pattern, fabric selection, piecing things together, and sewing the binding) but I'm pretty sure I know what my least favorite part is: quilting. The actual process of sandwiching the layers, basting them together, and then sewing for 1 jillion hours, wrestling yards of puffed up fabric, jamming it all through a much too small machine, adjusting the tension, endlessly switching colors and re-threading bobbins. Yes, the quilting part. Not always a fan. This falls squarely in the "wrong tool for the job" category of problems. Pretty much anything larger than a crib sized quilt calls for a long arm. My machine (ok...and my talent) has its limits- from a size and intricacy perspective, so I can technically do my own quilting but it's definitely not my strongest skill. I have hired a professional quilter before, made use of a friend's set up, and tried renting time on the long arm at Joann, but for the most part I've just been making it work on my own (it's certainly the most economical option...and despite how lonnnnnnnng it takes me, it's still faster than sending it out for someone else to do it). I knew this one would be a little tricky, but ended up being putting it a bit mildly. I  followed the same design that I did for the baby versions of this quilt- straight lines on the stripes, diagonals to match the mountain angles, and a sunburst in the middle, so I at least had a little experience with my plan of attack. But I had some trouble with my spray basting (I tried a new product and did not have success...plus it's really hard to find an open clean spot to spray a quilt of this size) so I had to pin it together instead. I've never done that before, and it ended up having areas that weren't quite smooth. Whiiiiiiiich I didn't realize until I was deep into quilting. There were a few areas that puckered and folded up wonky, so I had to seam rip and start over on a few spots. In the end, there are still some spots that I'm less than proud of, but again, I try to focus on the intention and know that it's less about perfect results and more about the thought and effort behind it all.  
 
 
  • Timeline: Will I never learn? Apparently I thrive under pressure (or am a glutton for punishment) because while I had about a month to work on this project, I dragged my feet and didn't really get going until a week before her departure. All told it was about 22 hours of work split over 10 days. I don't love the feeling of my back being against a wall, but it is an effective motivator!

  • Media of choice while I worked: Ugh. Nothing great. After the high of watching the Olympics every night (one of the major reasons I delayed putting serious time in on the quilt), I couldn't quite get into anything. I hopped around a bunch of nothing-noteworthy on Netflix, and listened to most of The People You Meet on Vacation. But didn't find anything that kept me entertained and motivated.
  • New thing I tried/learned: This was a pretty improvisational project...partly because it was designed to follow more of a loose plan, and partly because I kept making mistakes that required some pivoting. Noteably- running out of binding when I had literally one inch left. WHYYYYYYYYYY? I refused to admit defeat on the eve of final completion, so I turned that issue into an opportunity for a little extra design detail. I decided to do a little section of pop colors pieced together to bridge the gap in the binding (apparently the unofficial theme of this quilt is: "stripes to the rescue"). I was really nervous that it wasn't going to turn out how I imagined (I didn't want it to look like a patch covering up a mistake...even if that is pretty much what it was) but in the end it's one of my favorite parts of the quilt. It's another unexpected little twist, and a reminder that for better or worse, this is a one of a kind piece.

  • Final thoughts: I didn't adore every step of the process with this one...but despite the struggles, there's still nothing quite like the feeling of wrapping yourself up in the fruit of your labor. Or in this case, wrapping someone else up in it. I love all my quilty babies (even if some of them give me more trouble than others!) and I am thankful for the chance to learn and grow (and have something beautiful to show for all the mind-bending work of it all). We're going to miss Ali, but I'm excited for her Arizona Adventures, and happy to be able to provide a little piece of home to bridge the gap into her next phase. Sleep well, sunshine!


Sources/Details:

Pattern: Based on the NightSky Quilt, with custom adjustments to make it a twin
Finished size: Twin- Roughly 72" x 90"
Total Time spent: 22 hours 
Cost: Maybe it's a little tacky to talk about this (it was a gift after all) but I think it's interesting to know what goes into projects like this, so I'll share. I didn't keep track super accurately, but all in, it's roughly $120. (For reference, the baby quilts were approx $65 for both, which I attribute to a combination of less expensive fabric, better coupons/deals, smaller size, and more effeciency with making two of the same thing).
Fabric: JoAnn's brand solids & Kona Cotton solids (some purchased at Quilt Beginnings) Backing fabric: Quilter's Showcase: Oasis Modern Geo 
Custom name tags: Mission Market Co. I ran out of the first batch she made, so she whipped up a new design for my next round (here's the listing for the tags...but I dare you to browse her shop and NOT find something you NEED.)
Binding: Cluck Cluck Sew machine binding tutorial, using three 3yd packs of double fold bias tape.
Batting: Pellon Nature's Touch Cotton Batting Twin Size 72"x90"

P.S. See more quilty goodness: here on the blog, or on IG via #bowdenismsews

--------------------------------------------
Psssst....Want to get all the Bowdenisms news delivered right to your inbox? 
YES PLEASE! Subscribe via email and never miss an -ism.  xox.

Monday, June 7, 2021

Twin Peaks

It seems hard to believe that I made my last quilt over a year ago...and yet, the blog archives don't lie. I do tend to pursue my hobby in seasons though. Sometimes literally matching activities to the weather (feels good to hunker down with a craft in the winter), but more often, I just get totally obsessed with something for a while, and then utterly neglect it for months (or forever) thereafter. So I suppose it's not shocking that I went through a dry quilting spell after last Spring's big boom. 

I am what I'm unofficially dubbing an "occasion" quilter- calling myself out of semi (and accidental) retirement when there's something special to make. And WHAT, I ask you, is more special than a dear friend having TWIN BABIES?! Well, pretty much nothing. That's what. When our friends shared that they were expecting a boy and a girl this Summer, I knew I wanted to make something just the special-ist for these two impending bundles of joy. If I had been as smart as I am thoughtful (jokkkkke)- I would have started them a long time ago...but as per always, my ambition out paces my capacity, so that's how I found myself with exactly 10 days to work with from pattern purchase to baby shower unwrapping. It was...aggressive. But there's just about nothing I adore than more creating something for someone I love, so this was a double dose of YES for me. 

But before we dive into the behind-the-seams details, let's just bask in the sunshine-y reveal for a moment:

Aren't they the sweetest?! (The quilts and the nearly invisible but audibly whiny quilt models).

"My arms are tired! It's hottttt...."
"Hold them up higher and just keep running, ladies, I have a VISION!"

The quilts fraternal twins- just like the future recipients. I wanted to do two of the same pattern with some subtle differences to make it fun. The pattern is designed to be a bit improv-based, so it made it easy and fun to play around with the piecing and proportions to give them both their own style.

So that's the cliff's notes (crib sheet?) version of these babies...but for those of you hungry for the play by play, here's the full story:

  • Quilt Pattern: NightSky Quilt by SkyClad Quilts. I had it saved on my IG favs forever, and thought this would be a fun pattern to try for these babies. (it helps that it's really only sized for crib quilts...but I'm sure it could be adjusted if you wanted to make it happen for a larger size). I knew almost nothing about the nursery decor etc. but I knew the mom wasn't overly traditional or tied to typical gender colors etc, so I thought something inspired by nature (if it's not obvious, the pattern is supposed to represent a sunset over the mountains) with bright colors would be perfect. The official version includes a moon and some embroidered stars which are lovely- but seemed a bit out of my skillset (I've never done embroidery or applique) and a stretch for my timeline. Plus- not to cop-out here, but I honestly looked at my quilts in the end stages and preferred a slightly more abstract version, so I nixed the extra details. Practicality and aesthetic win.
  • Fabric: All solids- mostly JoAnn's basics with a Kona Cotton thrown in there to be fancy. This is my first quilt made with all solids, so that was a fun little challenge. Even though in a way it's much easier than print mixing, I still wanted to nail the color range, so I pulled out allllllll the bolts to find my favs. A scant hour later, we had the winners. (I'm not exaggerating or complaining about spending the better part of an afternoon agonizing over nearly identical swatch shades, because choosing fabric might be my favorite stage of quilting. Although...I kind of say that about every stage. Except the fighting-with-my-machine's-tension stage. THAT- to use a parenting parallel- is like the "toddlerhood" of quilting, i.e. a necessary evil on your way to much more enjoyable times.)


lovvvvve a good ombre.
  • Backing design: Kept this sooooo simple, by choosing to go with a single fabric on the back. (I tend to get a little wild with my quilts sometimes, making the back just as intricate as the front). I had some really adorable options for the back, but eventually landed on two colorways (pink and blue, naturally) ofTriangles Keepsake Calico Cotton Fabric. I love how they pulled out different colors from the front, made the quilts unique from each other and mimicked the angles on the front. The print was busy enough to not need any other piecing detail, and it hid my quilting stitches well. So basically...exactly what I needed.


  • Quilting design: This was another first for me- varying the quilting pattern within each fabric piece. Normally I just do some version of straight lines throughout the quilt- either at a set distance or a varying widths (without a longarm I can't get too fancy). But for this one I wanted to try mimicking the shape/direction of each shape, so I did horizonal lines for the sky, diagonal lines matching the angles of the "mountains" and a simple sunburst design in the middle. I graduated the straight lines spacing from wide to narrow depending on the size/placement of the piece, to give a sense of depth. The quilting part might be the hardest part for me (it's definitely the most time consuming) but there is nothing better than seeing a project transform from pile of fabric to "real" quilt as it gets those puffy, crinkly shapes. 


  • Timeline: As I mentioned, I set myself up with a bit of a hard deadline on this one. I bought the fabric on Tuesday May 25, and had to have them wrapped up in the car by noon on Friday June 4. I kept track of my time, just because I think it's interesting to know what really goes into making a quilt (it always feels like a lot. And guess what! It is!) All told, I estimate I spent about 20 hours on these. Some parts are more efficient when you're doing two of the same thing (I was always faster on the second one because I had my process figured out better) but some parts just take what they take. I split the work up over 6 days, which translates to around 3 hours per day (or more accurate: 3 hours per late night). Not a sustainable hobby for the long term (I think with those kind of hours it's really more of a part time job) but fun to immerse myself in it for a short burst.
  • Media of choice while I worked: Real Housewives (NYC and Beverly Hills). I accept no judgement on this. These quilts will be infused with the wisdom and class of generations of women, poured in through my ear bud osmosis. (I also made it thorugh the full season of The Queen's Gambit, so my brain iddn't totally atrophy).


  • Final thoughts: I don't know if it's arrogant to be this proud of something I made...but, dang I sure am proud. I think quilts are a little bit like kids in that way- it's not really about all the awesome stuff I did to make them turn out well...it's more of a gratefulness and appreciation for beauty and learning (ok- with a little dash of acknowledgement for all the awesome stuff I did to make them turn out well). I don't know if I adore the process or the end result more...but I do know I want to start on another quilt pretty much immediately, so if any of my friends want to have a baby (or two), call me!


All Sources/Details:

Pattern: NightSky Quilt
Finshed size: Roughly 44" x 48
Total Time spent: 20 hours (for both)
Fabric: JoAnn's & Kona Cotton solids, Triangles Keepsake Calico Cotton Fabric
Custom name tags: Mission Market Co. (I used my last two, so it's time to reorder!)
Binding: Cluck Cluck Sew machine binding tutorial, using two 3yd packs of double fold bias tape.
Batting: Warm Company Warm & White Cotton Batting, pre-cut crib size: 45"x60".


P.S. See more quilty goodness: here on the blog, or on IG via #bowdenismsews

--------------------------------------------
Psssst....Want to get all the Bowdenisms news delivered right to your inbox? 
YES PLEASE! Subscribe via email and never miss an -ism.  xox.